Showing posts with label Ottolenghi. Show all posts

Wednesday, July 6

A new winter coleslaw, you will never go back....


Big call I know, but this is seriously moreish. Mum wanted some to take home but a few sad scraps of cabbage was all that was left, and it was a big bowl of slaw......
Thanks again to the wonderful Yotam Ottolenghi & his glorious Plenty, if you don't yet own this cookbook can I suggest you immediately purchase? In the meantime keep yourself going with this little gem. Macadamias are caramelised with chilli & salt, then crushed & sprinkled through a crunchy mix of cabbage , herbs, chilli & fresh orange, dressed with a sweet salty vaguely oriental dressing. Tempted? Actually I used cashews in the picture as the macadamias I had were from my friends tree. Short of a jackhammer I am not sure how I was supposed to get to the nut, how hard are those shells???


Handful of macadamias
1 tsp butter
2 tbsp sugar
½ tsp salt
½ tsp chilli flakes
¼ savoy cabbage finely sliced
¼ red cabbage finely sliced
1 orange, peeled and cut into small chunks
1 fresh red chilli, finely sliced
Honey roasted cashews (or peanuts), chopped
Handful of mint leaves
Handful of coriander

Dressing

50 ml lime juice
½ stalk lemongrass, bashed to bruise
2 tbsp maple syrup (use the real thing here)
1 tbsp toasted sesame oil
½ tsp soy sauce
Pinch chilli flakes
2 tbsp light oil, eg sunflower, canola


To make the dressing put all the ingredients except the oil in a small saucepan and bring to the boil. Boil for approx 5 minutes until thick & syrupy, then strain. When cooled a little beat in the oil and set aside

Lightly toast the macadamias (or other nuts) over a medium heat until lightly coloured. Stir in the butter and allow to melt. Sprinkle over the sugar, salt & chilli flakes and cook for approx 1-2 minutes until caramelised. Watch it as it will burn in seconds! Turn onto greaseproof paper & allow to cool, then roughly chop.

To make the slaw combine the cabbages, orange, chilli, nuts & herbs and toss to combine. Dress and toss again, then check the seasoning. Sprinkle over the macadamias just before serving.


If you don't want to make the caramelised nuts you could also use honey roasted peanuts or cashews chopped for a similar crunchy bite. But I do urge you to try the original at least once, it really is amazing. I served my slaw with snapper fillets wrapped in prosciutto & quickly pan fried. It is also great with a simple roast chicken.

Ok, I havent posted a gratuitous kitten picture in a while, so please enjoy Tommy & Tupppence reclining. I like to remind myself how cute they are asleep. As opposed to dawn raids on the bench, terror attacks on the dishwasher & generalized assaults on innocent shoelaces at any time.....nothing is safe!


I hope you are having a great week, remember to relax & have a snooze now and again.........

Thursday, February 17

Green bean and pea salad with feta...


After the pastry fest that was my sausage rolls, I thought some lighter fare was in order. A salad chock full of lovely crisp beans, peas, sweet tomato, zippy mustard and a final flourish of feta and bacon? Don't say I don't look after you......

This started life as a recipe form Ottolenghi's Plenty, but to be honest I have never actually eaten his version. My sister Lizzie made a variation of it for a BBQ dinner last week, and I liked it so much I wanted to recreate it at home, as a main meal salad rather than a side dish. I realised I was missing a few ingredients , and adding a whole lot more, so it is more a homage to the original. Anyway it is delish.

Green Bean and Pea salad with Feta

( inspired by the Green bean salad with mustard seeds and tarragon from Plenty)

Serves 2 generously

125gr french beans, top and tailed (that's about a large handful)
1/2 cup peas- I used frozen, but fresh would be lovely
1 tsp coriander seeds, crushed or use ground coriander
1/2 tsp Dijon mustard
2 tbsp olive oil
1/2 small red onion, finely chopped (or use spring onion)
1/2 fresh red chilli, finely chopped
1/2 garlic clove, crushed
zest of a lemon
1 tbsp chopped fresh tarragon
Handful of lettuce, buttercrunch is nice here
salt and fresh ground black pepper
Feta cheese
4 rashers of streaky bacon, fried or grilled until crisp (optional)


Bring a medium pot of water to the boil, add a dash of salt, and throw in your beans. Boil for 3 minutes, then take out of the water and put in a bowl of cold water that has a few ice cubes floating in it. After a minute or so, put the beans on a paper towel to dry off. This might seem a faff, but it takes the raw edge off your veges, while leaving a nice crunch for your salad.. Repeat the process with the peas, but they only need about 40 seconds.


In a small bowl put your chopped onion, mustard, chilli and garlic. Heat your olive oil in a small frying pan, and add your coriander seeds or ground coriander. Sizzle for a few seconds then pour over the onion mix and stir through. That's your cooking done.


Put your drained peas and beans in a salad bowl, and toss with the onion mixture. Add the tomatoes, lemon zest, and lettuce and season with salt & pepper to taste. Divide your salad between two pretty plates and crumble over your feta cheese and bacon if using.

This is seriously good, satisfying without being too heavy, and full of different flavours. The mustard and chilli give heat, while the pea is sweet, and the beans have great texture. I also thought it would be great with grilled fresh scallops, in which case I would keep the bacon (I love pork and shellfish together) but lose the feta cheese.
You could also lose the bacon and feta altogether and serve with some lovely little grilled lamb cutlets, in which case I would add some fragrant mint leaves to the salad..........have I convinced you to give it a go?


Ok, now for a tiny brag...........I was very excited this month to have Plum Kitchen mentioned on the Web Mistress page of the latest Next magazine. Look out for it, Maggie Barry is on this month's cover. Also make sure you check out the other lovely NZ food blogs mentioned,

I am in rather good company indeed. You can also see a version of the article at Lindsey Out Loud, Lindsey Dawson's blog. Have a read!

Tuesday, October 12

Gorgeous eggplant/aubergine dip......and a tiny piece of advice


My little heart skipped a beat the other day when I saw shiny firm glorious eggplants (or aubergine if you are posher than me, which is entirely likely...) at the food market on a 2 for $5 deal. Maybe this means I need to get out more, or am simply very easily pleased , or both, but I fairly skipped up to the counter.

I adore eggplant, and we eat plenty all spring and summer. The texture is great, be it grilled until tender on the BBQ or grill, fried with loads of garlic and tomato, or as in the following recipe, a delish smokey dip. Whatever you do with eggplant, give it plenty of seasoning, and do cook it well, a half cooked eggplant is grim indeed, it needs to be soft and melting........

The following dip is a simplified version of an Ottolenghi recipe (yes, again!) , from Plenty. It is easy, tasty, and has already become a fav in our house, try it.
Please don't let the Pomegranate Molasses put you off, I found this at my local supermarket, but any specialist food shop or Middle Eastern shop should carry it. I FINISHED my last bottle, it didn't just sit there until I threw it out......... It is fab in dressings, and I have a glorious red pepper and walnut dip it really peps up, I will post the recipe as spoon as I dig it out of my overflowing recipe box....if you cant find it, I would try some tamarind paste/water which is available at any Indian store....

Eggplant Dip (based on Burnt Aubergine with Tahini recipe from Plenty)

2 Eggplant
2 tbsp of tahini paste
1/4 cup of cold water
1-2 tsp pomegranate molasses
Squeeze of lemon or lime juice
1 clove garlic, crushed
2 tbsp chopped parsley (coriander is also great, and mint)

Prick your eggplant a couple of times with a knife, and place on a baking tray lined with foil or baking paper (if you are using foil make sure the shiny side is up so it reflects the heat). Place under a hot grill for 45 minutes or so until the skin is black, and the eggplant is collapsing. This sounds nuts, but you are not eating the skin, and this burn imparts a lovely smokey flavour to your dip. Trust me.


 When the eggplant has cooled down a little, split it in half and scoop the soft insides into a colander.
You can biff the skin, it has done it's job.
 I know it does not look terribly appealing at this stage, but bear with me.
Let the eggplant flesh drain for about 20 mins or so, and place into a bowl with the rest of the ingredients. Mix together, then taste and check the flavour.
The pomegranate gives a lovely sweet sharpness, while the tahini adds depth, adjust adding a little more or less depending on how you like it.


We have had this a couple of times recently, once as a yummy creamy topping for lamb pita pizza's....


and once as a delish side for some lamb kibbe patties I made, experimenting with bulgur wheat. I have not perfected this recipe yet, but when I do I will post it toot sweet........


On another note entirely, can I offer you a friendly piece of advice? If you are tired, and cooking Mac n Cheese, because you require comfort food, and a recipe you can make without actually engaging your brain, BE AWARE! Testing your little pasta shapes for al denteness can result in a hidden pocket of boiling water bursting out and dribbling down your lip and onto your chin..........this can then result in much swearing, burning, tears before bedtime and general unhappiness. And some clown at work asking if you have a cold sore. No, I have a severe pasta burn............and it isn't funny pal.
Lets be careful out there.

Friday, September 24

Sneaky vegetable muffins, a spanish mama's tortilla and a newsletter idea.....


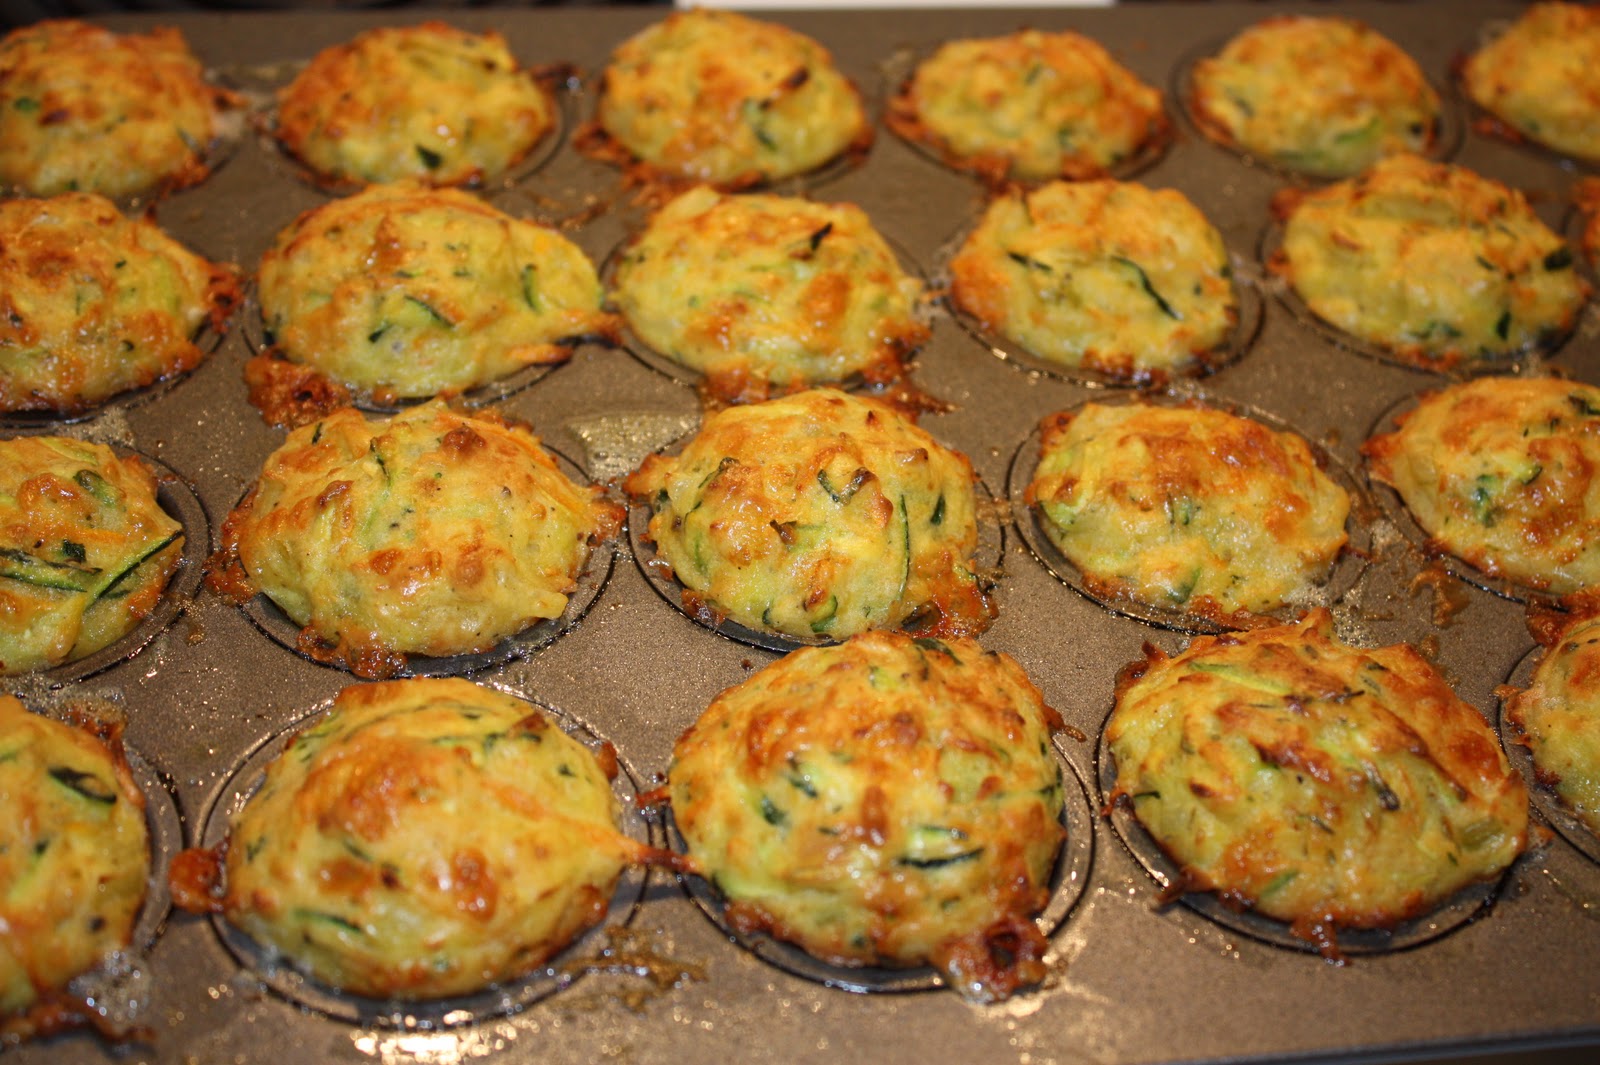
The Zucchini muffins are the absolute best, I know you should not rave about your own food (although if you dont who else will?) but I have been making them for years and I know they are foolproof. I had a lovely email this morning from one of the girls who came on Wednesday, she made these to take to her daughters Kindy shared morning tea, and they went down a treat. She commented the parents loved the hidden vegetables, which is just great. I dont have kids, but I have made them before for children who seem to like them as much as grown ups (I think the vege makes them slightly sweet?), little do those small bundles of energy know, but they are eating loads of vegetables with every bite! Ha ha, I feel so subversive.....


Zucchini Muffins


This makes about 12 normal size muffins, or 24 mini muffins, which make fantastic canapés

Approx 500 grams grated zucchini (this is 5 normal sized vegetables, not marrows!)
1 carrot grated
1 medium onion peeled and diced finely
About 2 tbsp chopped parsley
1 cup grated cheese (Tasty is fine here)
1 cup self-raising flour
¼ cup canola oil
Salt and fresh ground black pepper
4-5 eggs (depending on size)

Pre heat your oven to 180C/350F

Drain your grated zucchini, by placing them in a clean tea towel, and squeezing out as much moisture as you can, you will be surprised how much comes out of even very firm vegetables.

Put into a large bowl, and add the grated carrot, onion, cheese, flour and canola oil. Stir together, and add plenty of salt and pepper.
Add 4 eggs, and stir the mixture thoroughly, it should be moist but not to runny. Unlike normal muffins, this batter can take plenty of stirring without producing a tough result. If the mixture looks to dry, add the remaining egg.
Bake in greased muffin trays for about 20-25 mins at 180C until golden brown. Mini muffins will only take 15-20 mins.

These are so moist they don’t need buttering, but the mini version are divine split and filled with cream cheese and a sliver of smoked salmon as a canapĂ©.

I have also served them filled with goat cheese and a tsp of beetroot relish

If you are feeding meat eaters, 3-4 rashers of chopped bacon can also be added to the mixture before baking.


Well, a few small branches on the Silver Birch aside, we survived the big storm which battered most of New Zealand last week. I felt so feeble after posting about my fair weather gardening, I actually got myself outside, dodging rain showers, and planted out a whole bunch of seedlings and lettuce plants. The neighbours must think I'm slightly deranged, standing in a force 10 gales trying not to inhale all my potting mix, while simultaneously getting minuscule seeds out of a tiny packet which refuses to open (if you want to keep something safe, put it in a foil seed sachet, they are practically impenetrable)

I felt very pleased with myself, thinking when everyone turned up at my cooking class on Wednesday night they could admire all my new herbs pots while coming up the path. Given it was dark by 7pm, and the front light bulb has blown, they were probably just lucky not to fall over one.......

The cooking class was great fun, and thanks to the lovely Mairi over at Toast and her whizz iPhone, I even have pics for you. It is usually impossible for me to take pictures and conduct the class, so it was great to get some nice ones to show you.


First up we made a proper Spanish Tortilla. I am using the word proper, even though we are a long way from Espana, as I see so many "tortilla" in cafes which would make any Spaniards blood boil. A tortilla is not a stodgy lump of leaden egg and potato, nor is it a dumping ground for every root vegetable known to man. It should be sweet, light, and yet substantial, and should never, ever have seen the inside of a fridge.....

This really is so much more than the sum of its parts……it was taught to me by my friend Jose’s mama Victoria, in her kitchen in Sedella in Andalusia. She is a great cook, but even if you are not using your own eggs, onions, potatoes AND olive oil as she does, this will still taste fab....the ingredient list looks sparse I know, but trust me...


Victoria's Spanish Tortilla
3-4 good size potatoes (as you probably know by now, I use Agria)
2 cups of Olive oil (I KNOW, it seems horrendous, but most of it is drained away & can be reused)
2 medium onions
4-5 eggs

Peel and slice your potatoes into small chunks. A Spanish mama would do it in her hand straight into a bowl, but feel free to use a chopping board (I do!) I cut the potato in half, then half again, and cut slim half moon shapes, as i like the way it looks when cooked and sliced, but it is really up to you
Peel your onions; slice in half then into thin crescents and chuck in bowl with your spuds. Add 1 1/2 cups of oil and mix all around to coat vegetables. Season generously, and I mean generously, potatoes need salt.

Put the whole lot into your non-stick frying pan. The size of your pan will dictate how many potatoes you use; this is enough for a 23cm pan. If the oil isn’t really coating the potato, add more, you are basically stewing the vege in the oil. But remember as the oil heats it becomes more liquid, so it will cover the potatoes more, check once they start simmering and add more then if needed.
Cook over a low heat for approx 20 mins until the potato feels tender, then drain off the oil (which can be used again no problem).I keep my oil in a jar in the pantry

Tip the spud mix into a bowl, and add 4 beaten eggs (add the remaining egg if the mixture looks too dry). Mix and add a little more seasoning, then tip the whole lot back into your frying pan, and put back on the heat. You can turn the heat to med-low, and cook for about 10-15 mins, until the bottom is golden and the egg mixture is reasonably set (so when you turn it out it isn't going to run everywhere)

Flip onto a plate, and then slide back into the pan to cook the underside for another couple of minutes.
This isn't nearly as tricky as it sounds. Take the pan off the heat, put a plate on top of the frying pan, and using a tea towel to protect your hands, grab the plate & pan together and flip. The tortilla will drop onto the plate. Now put the pan back on the heat, and slide the tortilla off the plate and back into the pan to cook for about 5 more mins. Turn out onto a serving plate

I like to serve this warm or room temperature. It travels well, so is great to take on a picnic or BBQ, I actually made this to take to the Ronan Keating concert at Villa Maria last Feb. A slice of tortilla and a glass of chardonnay was rather nice sitting in the sun! I usually just have it plain, but you could serve with a chutney or sauce to if you like, and maybe a salad, for a lovely spring/summer lunch.

We also made some Zucchini muffins, and rather delish Broadbean cakes, adapted from Yotom Ottolehghi's Plenty, I think I have raved about this book already.

On a totally different tangent, I came across this neat magazine the other day, Extra Curricular for people who like craft and do it in their spare time. It is published independently by Ellie Smith and some of her crafty pals. I love the mag, it is quirky and interesting and I love the fact it is put together without the aid of a big publisher or huge budget. Check the link for stockists, I got my copy at Mag Nation on Queen Street.

On this theme, I am eagerly awaiting my copy of Martha Goes Green, a vegetarian cookbook put together by three girls in Australia (a couple are originally from this side of the ditch) ,designed and  published by them independently, how gorgeous does it look? I cant wait to get my mitts on this & get cooking.....

Speaking of doing things independently, and being rather wonderful about it, check out the Underground Farmers Market, held in the flat and garden of Ms Marmitelover. This woman is fabulous, not only does she run an amazing underground restaurant in London (and is a total pioneer in the whole movement, setting up the network I belong to) but she does completely fabbo things like this, I mean, a whole market in a 2 bed flat & garden............how cool?

Cooking classes in kitchens, books from bedrooms, markets in flats, nothing like the spirit of DIY people, it's very inspiring:)
On that theme, I am setting up a little publication of my own, a Plum Kitchen Newsletter, which will be sent out monthly. It will have cooking class updates, supperclub dates, tip, recipes (of course!) , reviews and hopefully even some interviews (that's if a) I can find someone interesting who wants to talk to me, and b) I can shut my trap long enough to listen,) plus anything else I care to chuck in.....
To subscribe, please just send me an email and I will add you to my mailing list. Dont worry, I will NEVER send you crappy jokes, inspirational messages or ads for mens pharmacuticals, or give your email address to anyone else:)

Have a great weekend!

Wednesday, July 21

How great the gratin....


I am still undecided over the success of last nights dinner . I was back in the kitchen with my friend Yotam Ottolenghi, making a Winter Saffron Gratin.

As you might have noticed I am a big fan of the gratin. You could take pretty much anything (and I mean anything, spuds, cardboard, last weeks leftovers..), chuck some sauce over, grill the top till crunchy and I'll be first in line with a spoon. So I was pretty excited about this, even when I got to the shops and realised a) I wasn't entirely sure what kohlrabi looked like and b) they didn't have any anyway. Ditto tarragon, which was annoying as I knew my little pot of aniseed heaven in the garden had succumbed to the cold weather. I would have to improvise. I hope non of my cooking class students are reading this. I always encourage them to stick to the recipe the first time around, then fiddle at will after.............do as I say, not as I do people!

Anyway, I sliced up a kilo of vege, roughly equal quantities of Jerusalem Artichoke (VERY roughly peeled, is there any other way with the darn things??), swede, parsnip, and my substitute kohlrabi, turnip. I was tempted to chuck a few sliced spuds in as well, which in hindsight I  wish I had. I blanched the vege for a minute in boiling water and drained, then stirred through my sauce. This was a bechemel made with 30 grams each of butter & flour, and 100ml each of water and milk, in which a 1/2 tsp of saffron strands had soaked. I find saffron very hard to measure as the strands are to long for spoons, so I eyeballed it, if anything I was a bit mean (it is expensive stuff!) yet the sauce still ended up very strong. I stirred in 150ml of cream which loosened it up, and a big handful of parsley. There should also have been 2 tbsp tarragon and 60 grams of basil joining the parsley, and I think in retrospect more herb flavour was required. 30 grams of grana padano (the recipe called for Parmesan) completed the sauce, with plenty of seasoning. The whole lot was put into a greased gratin dish (ok, it was a  casserole, but doesn't gratin dish sound nicer?) and covered with foil for a supposed 40 mins at 160C...........that would be dandy if you like crunchy root vege, I don't so it took another 35 mins at 175 and we were nearly there. The foil came off and another 30 grams of cheese was mixed with 3 tbsp of panko breadcrumbs and sprinkled over the top for cheesy crunchy goodness. 10 mins later we ate.
 It was good, creamy and comforting, but I think it was a little too strongly saffron, and a little sweet. The inclusion of a potato or two may have tempered this, my husband loved it and he has a very sweet tooth, so this could just me my taste buds. Next time I will infuse my milk with bay and onion as well as the saffron, for a more savoury note, up the herb quota but give the turnips a miss, and include some potato. I will also use a bit more cheese, maybe some Gruyere as well..........a bit like grandads hammer, its kinda the same recipe.........but not really!

I didn't do nearly as much cooking this weekend as I hoped. I intended to make these delish crackers from over at pod and three peas but instead made the mistake of hanging a picture. We have been in our house six months, but have resisted hanging many of our pictures as we intend repainting. When? Exactly, hang some pics and make the house look lived in. I am especially pleased with this one, as it is a cheap Ikea frame, with a picture that has started to warp. I replaced it with a beautiful piece of wrapping paper from Passion for Paper, pretty,  although my home handy boy is starting to wonder how much more pink he will have to live with......Anyway one picture turned into about six, then I realised just how dusty everything was & thought I had better tackle that as well..............six hours later I was done, and too knackered to do another more taxing the sit at the Civic with my girlfriend watching Certified Copy with the lovely Juliette Binoche. In the best tradition of European films it involved relentless talking and an ambiguous ending, the jury is still out with us but do see for yourself.

On Friday Mr PK and I saw Cooking History which was an unusual documentary charting the history of cooking through European field kitchens. Mr PK has a long standing love affair with all things military (he is very useful to have at pub quiz), combined with my love of all things food (and documentaries) we had a perfect date night movie............

PS My friend Tiff wanted all my readers who are skeptical to know Lardy Cake is the best and should be brought back into fashion......

'That’s fab, I used to love lardy cake at school, we used have afternoon tea at 4pm everyday after school, a cup of tea and cake, some days lardy cake, others sticky willies (iced buns) or donuts, all sorts!!! Lardy cake was my fav though. Can’t seem to buy it in cake shops these days though.'

Thursday, July 1

Ottolenghi………the name on everyone’s lips

Well, if it isn’t it should be. Yotom Ottolenghi is an inspired chef, and the owner of 4 eponymous restaurants in London. Check them out here http://www.ottolenghi.co.uk/ His second cookbook Plenty http://www.ottolenghi.co.uk/blog/2010/03/02/plenty-by-yotam-ottolenghi/ has just been released, and is a beauty. The food is fresh, interesting, and makes you want to go into the kitchen and start throwing ingredients around immediately. The July issue of Cuisine magazine has several recipes from the book, and you can also check them out on the Guardian website here http://www.guardian.co.uk/lifeandstyle/series/thenewvegetarian


I cooked this particular dish (recipe downloaded from the Ottolenghi website) as it reminded me of a meal Mr D and I ate in Egypt a few years ago. Well, Mr Cast Iron Stomach and the rest of our group ate a plateful, I only ate about two mouthfuls, then ran off to be sick, which isn’t normally a good omen for a dish. This episode had been repeated in reverse a few nights prior except we were on our own.  We ordered dinner in a quiet neighbourhood restaurant, then about five minutes later Mr CIS turned an unusual colour (Resene Beryl Green I think it was....) stated he could not possibly stay, and left me sitting on my tod in a Cairo restaurant, where I was literally the only chick in the house. The lovely proprietor saw what had happened and dragged the TV in the corner over to my table, this made me feel worse as I was depriving everyone else of Knight Rider, but he insisted. I ate dinner and tried to concentrate on the Hoff as best I could with an entire room staring at me, and thanked him profusely when he carefully packaged up the rest of dinner so I could take it back for my missing companion. He insisted his son walk me the five minutes back to the hotel, so I was obliged to take the remains of my fragrant dinner right back to our room, where the patient strangely enough did not thank me.
I think my case of Ramses revenge was percolating well before the kushari made an appearance however, but despite this I could not even think about cooking anything remotely similar for a very long time (ie years!). Kushari is something like an Egyptian national dish, and consists of layers of macaroni, rice, lentils and sometimes chickpeas, with a vinegar tomato sauce poured over, and fried onion to garnish. Along with hummus, fried onions were also off my radar for some time.......in fact my highlight meal of that trip was a jacket potato with coleslaw and cheese I managed to locate in Luxor, and which I ate for three meals in a row. I actually managed to keep it down for a while. When we flew back to London I literally begged the BA stewardess for a second breakfast, some kind of blah"egg" type thing, it's very blandness  being a saving grace for me. You know your starving when you beg for airline food..........(despite this I adored Egypt, and would go back in a flash)

Mejadarah consists of rice and lentils, delicately spiced with cumin, turmeric & coriander, and garnished with fried onions. The original recipe actually deep fries the onions, but I simply shallow fried until crispy and golden, they were a delicious caramel accompaniment to the lentils and rice. According to the website, it is an Arabian dish, served in Lebanon, Syria and Palestine. I served it with cubes of lamb I had rubbed with a little oil,  cumin and sumac, then simply fried until crusty and golden, but still pink and juicy within. A side of chopped tomato and avocado with lime juice may seem odd, but I had to use the avocado, and despite looking a bit incongruous, actually tasted great, a creamy counterpoint to the spice. A drizzle of tahini and yogurt, beaten with a little more lime finished things off nicely.


Lucky me there was enough left over for lunch, a crumble of feta would have been perfect but I didn't have any so I supplied my protein with a boiled egg, it worked surprisingly well....

Mejadarah-from the Ottolenghi website

120g basmati rice
120g lentils- I used Puy lentils
1lt water
½ Tbsp cumin seeds
½ tsp ground turmeric
½ tsp ground cinnamon
2 Tbsp olive oil
Salt and pepper
1 large onion
Vegetable oil for frying
 
Slice the onion, lightly salt and place in a colander to get rid of some of the liquids.


In a saucepan, place the lentils and 750ml of cold water. Cook for 20 minutes or until the lentils have softened but still have a bite.

In a separate large saucepan, toast the cumin seeds until they are fragrant. Add the rice, olive oil, cinnamon and turmeric. Make sure the rice is coated evenly with the oil. Add the cooked lentils with their liquid and the remaining water. Add salt and pepper. Bring to the boil, cover and simmer on a very low heat for 20mins. Leave covered for another 10 minutes.

While the rice in simmering fry the onion till golden brown. Place on kitchen paper. Mix half the onion through and taste for seasoning. Plate the rice and garnish with the rest of the onion.